ДВИГАТЕЛЬ СТИРЛИНГА

ДВИГАТЕЛЬ СТИРЛИНГА

Двигатель Стирлинга представляет собой тепловой двигатель изобретенный Робертом Стирлингом в 1816 году. Он отличается от двигателя внутреннего сгорания, потому что топливо сгорает вне двигателя, что делает его гораздо проще в изготовлении. Есть двигатели Стирлинга, которые работают от тепла ваших рук, хотя их немного сложнее построить. Двигатель Стирлинга будет неплохим дополнением к любой коллекции любителей делать вещи своими руками.

Основной принцип работы двигателя Стирлинга заключается в постоянно чередуемых нагревании и охлаждении рабочего тела в закрытом цилиндре. Обычно в роли рабочего тела выступает воздух, но также используются водород и гелий. В ряде экспериментальных образцов испытывались фреоны, двуокись азота, сжиженный пропан-бутан и вода. В последнем случае вода остаётся в жидком состоянии на всех участках термодинамического цикла. Особенностью стирлинга с жидким рабочим телом является малые размеры, высокая удельная мощность и большие рабочие давления. Существует также стирлинг с двухфазным рабочим телом. Он тоже характеризуется высокой удельной мощностью, высоким рабочим давлением.

Сборка двигателя Стирлинга своими руками(на языке оригинала)

Что нужно для сборки двигателя Стирлинга в предлагаемом варианте:

3 X Coke cans
1 X Balloon
2 X Spoke nipples
4 X 5A Electrical terminal blocks
Fine steel wire wool
1mm steel wire (about 30cm)
Thick (1.6mm) Copper wire or 1.6mm — 2mm steel wire
Plastic Drinks bottle cap.
1cm length of 20mm Dowel rod (you could carve this as you only need a tiny amount!)
Super Glue
30cm of Electrical wire (we want the outer insulation, so 3 core mains will be fine!)
Fishing line about 30cm long
Small scrap of inner tube rubber about 2cm square.
Small weights for balancing (5p 2p nickel etc)
3 CD’s
A Lyles syrup tin or other tin for the firebox
Drawing pin
Super Glue
Red temperature resistant silicone
Tuna can for a water Jacket

Text instructions below.

Step 1: Prepare two coke cans
ДВИГАТЕЛЬ СТИРЛИНГАI have since bought a shiny new can opener which opens cans perfectly, ignore this nonsense about tin snips and sanding wheels.

Firstly you need two coke cans with their inside of their tops cut off. Use the tin snips to cut them, this will leave a lethal jagged edge which you must clean up either using a metal file or a small flap sander (could also use a Dremel)

 Then cut the bottom off the cans using a Stanley knife. Try not to crease the metal as this will reduce the chances of it being airtight. Some people say that you can use a can opener to remove the tops of the cans however I found that it destroys the sides of the can, you might have more luck!

Step 2: Make the diaphragm

ДВИГАТЕЛЬ СТИРЛИНГАThe diaphragm of this engine is made from a balloon (just an ordinary one, nothing special!). It’s reinforced with a piece of inner tube in the centre First of all cut the neck off a balloon and stretch the balloon end over the top of a can. Then cut a piece of inner-tube rubber about 1cm square and glue it in the centre of the balloon.

Once the glue is dry, you can use a drawing pin to pierce a hole in the centre of the diaphragm for the displacer wire. Leave the pin in the hole until your ready to fit the displacer later.


Step 3: Cut and drill the bottle cap

ДВИГАТЕЛЬ СТИРЛИНГАDrill a 2mm hole in either side of the bottle cap for the crank pivot, and a hole in the centre for the displacer wire.

Then cut either side of the bottle cap into a curved shape, this is because sometimes the displacer wire holder flicks to the side a little and it may hit the cap — This is more of an annoyance than a real problem, but you might as well prevent it if you can! Plus I think it looks better with the curves. I used tin snips here — they work well for cutting this thick plastic.

Now remove the diaphragm from the coke can and flip it over so that the inner-tube is on the inside of the can. Glue the bottle cap to the side of the diaphragm that does not have the inner-tube reinforcement. I sanded the bottle cap a little as I found that the glue doesn’t like to stick to this plastic.

The pin is left in place to line up the holes for the wire.

Step 4: Drill the bearing holes

ДВИГАТЕЛЬ СТИРЛИНГАI used a long 3.5mm drill bit to drill the bearing holes. I just drilled them by eye, no need to measure anything. They should be near the top of the can where it bevels in. Make sure that they’re roughly level.


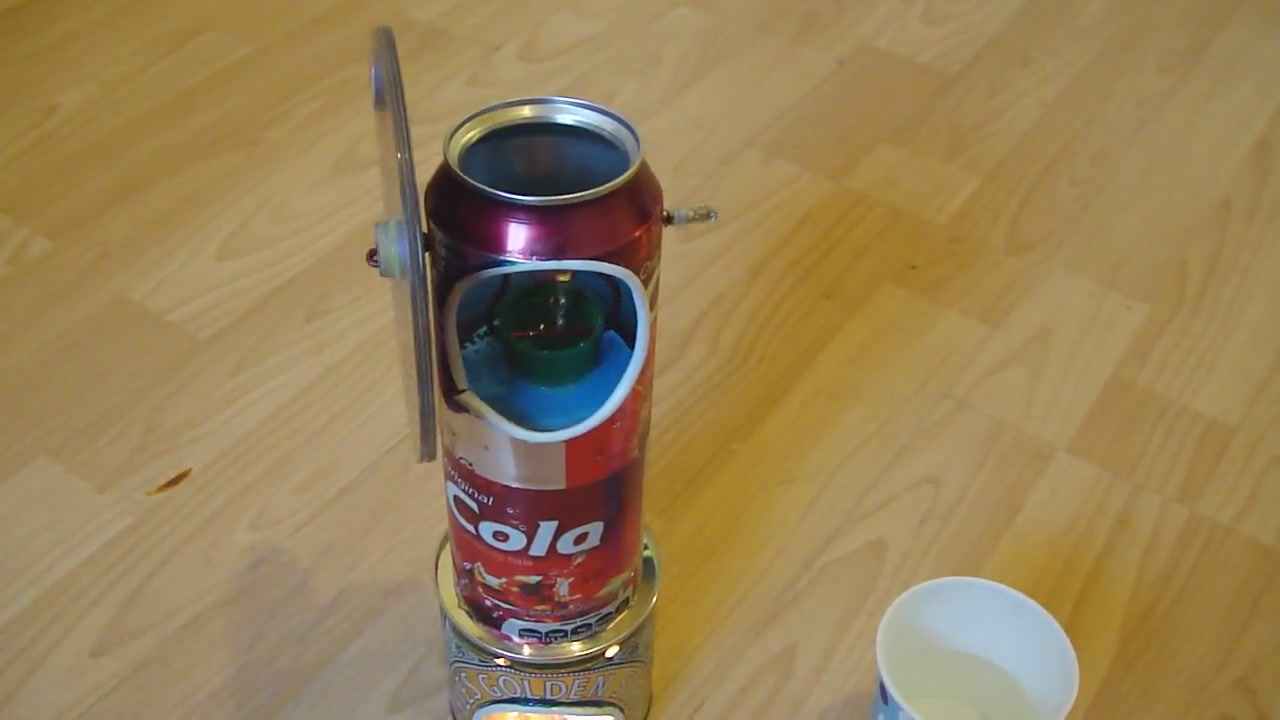
Step 5: Cut the viewing hole

ДВИГАТЕЛЬ СТИРЛИНГАNext, mark a circle roughly in the centre of the can, so that you can see the cranks/displacer wire etc. It doesn’t have to be a circle, but that makes fitting the trim easier.
 

Step 6: Separate some electrical connectors and drill them

ДВИГАТЕЛЬ СТИРЛИНГАNow you need to get some electrical terminal blocks and remove the plastic protection. The best way to get them out of their plastic blocks is to unscrew the screws as much as you can, then twist the plastic off around the screw thread with pliers.

Now drill a 2mm hole straight through the end of each one, as shown. You need three of these drilled. To drill them I held them with pliers.

You also need two of these not drilled in any way.

Step 7: Make the cranks

ДВИГАТЕЛЬ СТИРЛИНГАFor the cranks I used some 1.8mm (approx — I don’t know the exact size) copper wire — you can use old spokes, or steel wire, if you don’t have copper. I used copper because it’s easier to bend and I like copper. If you need to straighten the copper wire you can clamp it in a drill and hold the other end with some pliers — spinning the drill should straighten the wire. Make sure you wear some decent safety gear though, in case the wire slips!

I’ve included photo’s of every step of bending the cranks below. The displacer piece should protrude about 20mm and the other parts protrude about 5mm, no need to be exact though. The displacer part is at 90 degrees to the push rods — this is the best angle for this engine.

The electrical blocks are fitted as you bend the cranks, be careful to make sure that they all point the same way, as you won’t be able to access the screws from the viewing window.

Step 8: Drill the bearings

ДВИГАТЕЛЬ СТИРЛИНГАI used two spoke nipples for the bearings. You can get these at bike shops or scavenge them from old buckled/broken wheels.

Check your cranks before you drill them, they might fit without being drilled.

Like the terminal blocks, I drilled them out with a 2mm drill bit to remove the thread.


Step 9: Fit the cranks and bearings

ДВИГАТЕЛЬ СТИРЛИНГАNow you can thread the cranks though. You can thread them through the viewing window at an angle. If you can’t fit them through you can cut one end down a little until they do. You need to leave one end of the cranks long for the flywheel attachment though. The bearings should be a tight fit in the holes but if they are loose you can glue them in place.

Make sure that the screws point towards the viewing window so that you can tighten them.


Step 10: Make the displacer

ДВИГАТЕЛЬ СТИРЛИНГАThe displacer is made from steel wire wool wrapped around around a piece of steel wire. Bend a small hook in the end of the wire and begin rolling steel wool around this. Once you get near the size of a coke can, cut the wool. Pull out the wire most of the way and cut the wool so that the displacer is around 2 inches high. On the other end of the wire (not the hook end — bend a spiral, this is just to give the wire more surface area so it can’t be pulled out. Finally trim a slight bevel around the top to match the bevel on the coke can.

You can test the displacer in a coke can now — it needs to fall freely under it’s own weight. You can spin the displacer inside of the can to smooth it out. Try and make the spiral roughly into the shape of a coke can dome. Once your happy with the displacer movement you can tie about a foot of fishing wire onto the hook end of the displacer. Apply some super glue to the knot so that it can’t wriggle loose when the engine is running.

Now you can remove the pin from the diaphragm, so you can thread the loose end of the fishing wire through the diaphragm so that the inner-tube rubber will be on the inside of the pressure vessel.

Step 11: Make the pressure vessel.

ДВИГАТЕЛЬ СТИРЛИНГАCut the bottom off a coke can leaving about an inch from the base. Put the displacer and balloon into the pressure vessel, then push this base into the end of the can. Check that the displacer still moves freely.

Now fit the balloon over the top it should not be tight or loose — just tight enough not to sag.

Take an electrical connector that is not drilled and tie the fishing line through the screw hole about an inch above the bottom of the bottle cap — make sure that the displacer is at the bottom of the pressure vessel by tapping it on the table. Glue the knot so that it can’t come lose. Apply a drop of oil to the wire and check that the displacer can be pulled easily and that it falls easily pulling the wire with it.

Step 12: Make the push rods

ДВИГАТЕЛЬ СТИРЛИНГАNow you can make the push rods that connect the diaphragm to the cranks. Begin by taking a piece of copper wire (about 15cm long), threading it through the two holes in the side of the bottle cap. Then the push rods are bent inwards to match the distance of the cranks. You will need to cut the rods to length, they should just fit into the terminal blocks when their respective crank arms are pointing downward. Make sure that the rods can pivot freely in the bottle cap.


Step 13: Making the flywheel

ДВИГАТЕЛЬ СТИРЛИНГАTo make the flywheel, I used a 1cm piece of 20mm wooden dowel as a centre for some old CD’s . The dowel was about 0.5mm to big for the CD centres, so I had to sand it down a bit. Drill a 2mm hole all the way through the centre of the dowel and another around 3mm from the outside, about 5mm deep. This is so the crank shaft can be bent back on itself, to grip the flywheel. The CD’s are just glued to this


Step 14: Attach the flywheel

ДВИГАТЕЛЬ СТИРЛИНГАThe flywheel is held on by bending a hook on the end of the crankshaft, this fits into the extra hole that you drilled into the dowel.

Step 15: Connecting it all together and balancing

ДВИГАТЕЛЬ СТИРЛИНГАNow you can connect all of the parts together. The can with the cranks is pushed onto the top of the pressure vessel, don’t push the can from the very top at the front as this will crush the viewing window, instead push it from the bottom edge of the viewing window. You need to push it down about 4mm.

The first thing to do is connect the displacer and balance it. I cut a small piece of copper wire (about 30mm) to connect the displacer wire terminal, to the one on the cranks, the reason for this is so that the lower terminal block can be slid up and down, to adjust the displacer to stop it hitting the top or bottom of the pressure vessel. With the displacer connected, you can add a counterbalancing weight to the side of the flywheel opposite the direction that the displacer crank is pointing. The counter weight should pull the displacer crank part roughly horizontal, adjust the weight to get this right. I used tape whilst testing but glued it in place when I found the correct weight. I found a 5p coin to be about right for my engine.

The push rods are screwed into the outside terminal blocks, put the cranks in there lowest position and fit the rods into the terminal blocks. Tighten them up all up.

Step 16: Make the fire box

ДВИГАТЕЛЬ СТИРЛИНГАFor the fire box I used a Lyles golden syrup tin, which has a lip around the top that is a perfect for the base of the pressure vessel.

Cut an arch out of the front and drill about eight 8mm holes around the top for vents.

As an alternative to the Lyles tin, you can cut a hole in the top of an ordinary tin can that is a tight fit for the coke can.
 

Step 17: Fitting the trims

ДВИГАТЕЛЬ СТИРЛИНГАTo save anyone from getting cut on the sharp edges of the cans, I made a trim out of electric wire outer sheath. I cut the sheath down the centre so that it can be fitted over the edges of the metal. Cut it to size and glue it in place. Fit this around the firebox opening too.


Step 18: It’s finished now! Testing and troubleshooting

ДВИГАТЕЛЬ СТИРЛИНГАNow you can test the engine (at last!) . Light some candles and test! Hopefully it’ll work first time, but if not heres some tips that might help. Don’t forget to oil all the moving parts so it runs smooth particularly the fishing line.

Air Leaks: If you suspect an air leak, you can submerge the whole thing under HOT water and any leaks should be obvious. Hot water is important as it causes the air inside to expand forcing it out making any leaks obvious. Dry the area of the leak ASAP as the air will cool down sucking the water inside of the engine which will create steam when you try to run the engine, this will potentially blow the coke cans apart.

Too much friction: Does the engine turn reasonably freely? There will always be some resistance from the balloon stretching a little, but it should spin once or twice on it’s own if you give the flywheels a quick flick.

Engine is «too» air tight: If the engine is perfectly air tight then the air in the dead space will expand causing pressure in the engine which the normal movement can’t overcome. The symptom of this is that the balloon just bulges out no matter where the displacer is. The solution to this problem is to fit a small piece of fishing line under the edge of the diaphragm, this creates a tiny leak which lets the excess pressure out. Over time the displacer wire seal will wear down a little and you should be able to remove the artificial leak. You can’t fill the space between the top of the cans with water if you have done this as the water will seep in.
This shows what happens if the engine is too airtight, or possibly there is too much dead air space.


Step 19 Add a cooling jacket and possibly a generator.

ДВИГАТЕЛЬ СТИРЛИНГАYou can make your engine run better by adding a cooling jacket to help increase the temperature difference. For this you will need a tin can a little bit bigger than a coke can.

Mark around the can on the bottom of the tin so that you can cut the shape out with tin snips. You might need to file/sand the edges a little to get the tin to fit well. Push the tin in place near the top of the pressure vessel and seal around the bottom with RTV heat resistant silicone.

Видео (инструкция по сборке):

Рекомендуем почитать

  • ВИНТЫ САМОЛЕТОВВИНТЫ САМОЛЕТОВ
    Ежедневно мы пользуемся огромным количеством вещей и уже практически перестали их замечать. Но оказывается в производстве незначительных на первый взгляд вещей кроется масса...
  • ЛОКАТОР С ЛИДАРОМ ДЛЯ НЕЗРЯЧИХЛОКАТОР С ЛИДАРОМ ДЛЯ НЕЗРЯЧИХ
    В нашем обыденном мире, где подавляющую часть информации мы получаем визуально, любые трудности со зрением - это серьезная проблема, а полная потеря зрения часто превращается для человека...
Тут можете оценить работу автора: